Blog

  • How to Zoom pictures Without Losing Quality?  A Simple Guide in 2025

    How to Zoom pictures Without Losing Quality? A Simple Guide in 2025

    Today, Images are everywhere. Social media posts, websites, marketing ads, or personal photo albums. But zooming in or enlarging a picture often makes it blurry or pixelated. If you are here, you are problably looking for the process on how to zoom pictures without losing quality.

    Imagine you’re a photographer, a business owner, content creator, content writer, or just someone editing photos for sharing in social platforms. In this case, you want your images to stay sharp, clear and intact. But you face a problem of low quality image at the end. You know why it happens ? Because you haven’t read this article yet

    Now, from today, when you finish reading this Article, you didn’t have to face same problem again. Trust me. Only thing you need is understanding the concept better. In this Aricle, I will guide you step by step to resolve how we can zoom pictures Without Losing Quality and also gives you the best tips from expert sources. So, without talking too much, let’s dive in into the process and methods.

    Why Do Resized Pictures Lose Quality?

    A photograph loses quality when it is made larger. The reason is that you are increasing the size of the original pixels and the picture starts to look blurry or blocky, this process is called pixelation.The loss of detail is another factor. Most software available in the market cannot correctly determine what additional detail should be included in the photograph. So, fine details like hair, skin textures or facial features vanished.

    Our most popular Article: How to Easily Remove Unwanted Objects from Photos 


    To properly add missing pixels, resizing software also uses basic methods known as interpolation. Some even compress the image in order to conserve space which gradually decrease the image quality. Both of them produces strange marks known as artifacts or blur the image. So, these all are the problems we are going to fix in this Article.

    How to zoom pictures without losing quality?

    Now, we have discussed why the images loses its quality when we zoom in the picture and tools available in the internet cannot properly determine the pixels available in the picture. So, your first and best solution is AIPhotocraft’s Image Enhancer.

    When you zoom in your image without using any tools in your device, it loses its quality. You don’t need to know any editing skills. AI takes care of the technical stuff, so you can focus on what matters, making your photos look amazing.The only thing you have to do is following the steps below:

    Image Enhancer: AIPhotocraft.com:

    Step 1:

    Go to AIPhotocraft.com by opening your web browser in your device. Login with your gmail or you can enter your username, email and password to signup.

    Step 2:

    Hover on AI Enhancer located at the top of navbar. When you hover, it shows a dropdown with various tools available to use for free.

    Step 3:

    Now, Select the Image Enhancer by clicking on it. You will be redirected to another page where you can do your actual work.

    Step 4:

    Now, click on “your source image ” to upload the image you want to enhance. Then Click on Generate image and let the AI do the magic.

    Step 5:

    The AI will do its work and generate a Enhanced version of your image. Then you can download the enhanced image and have fun sharing it with your friends, share it on social media, or you can use that image in your professional work.

    Why to use AIPhotocraft instead of popular paid tools?

    Popular tools for enhancing photos without reducing the quality are: AI Image Enlarger Pro, Adobe Photoshop Super Resolution, and Topaz Gigapixel AI which are paid. They employ intelligent AI technology to minimize noise, enhance details, and maintain image clarity even when resized.

    They are renowned for producing high-end results with up to 10X enhancement, Adobe photoshop Super Resolution is perfect for pro users because it can work seamless in these type of operations.

    The Image Enhancer available in AIPhotocraft can be a good option to start if you are running out of time or working with a lot of photographs. With a single click, it instantly enhances the image. It’s particularly helpful for product or lifestyle photos where detailing matters.

    Pro Tips:

    If you want to zoom in your image without losing quality, you can try vector images. Vector image like SVG which doesn’t lose their quality when they are zoomed. They are suitable for logos and simple images.

    Another excellent technique is using AI upscaling software like AIPhotocraft. Software like Topaz Gigapixel AI or AI Image Enlarger uses smart tech to add new details. They make your photos sharp even when zoomed in.

    Always start off with a high-resolution image. The more pixels, the better for when you’re resizing it larger. Low-quality images will blur no matter what software you employ.

    Conclusion:

    Finally, it can be challenging to choose the best tool for zooming in on a photograph without compromising quality. Why to pay for expensive software when some free tools give you free credits to get the task done? Try using vector images that maintain their quality even when zoomed in instead of rushing into paid options. Alternatively, start with high-resolution images that will remain sharp even after expanding. Some AI applications like AIPhotocraft also offer free credits, so you can enhance your photographs without spending a rupee.

    You may also like to read: Best alternative of MioCreate for Face Swapping

  • AIPhotoCraft: Best alternative of MioCreate for Face Swapping in 2025:

    AIPhotoCraft: Best alternative of MioCreate for Face Swapping in 2025:
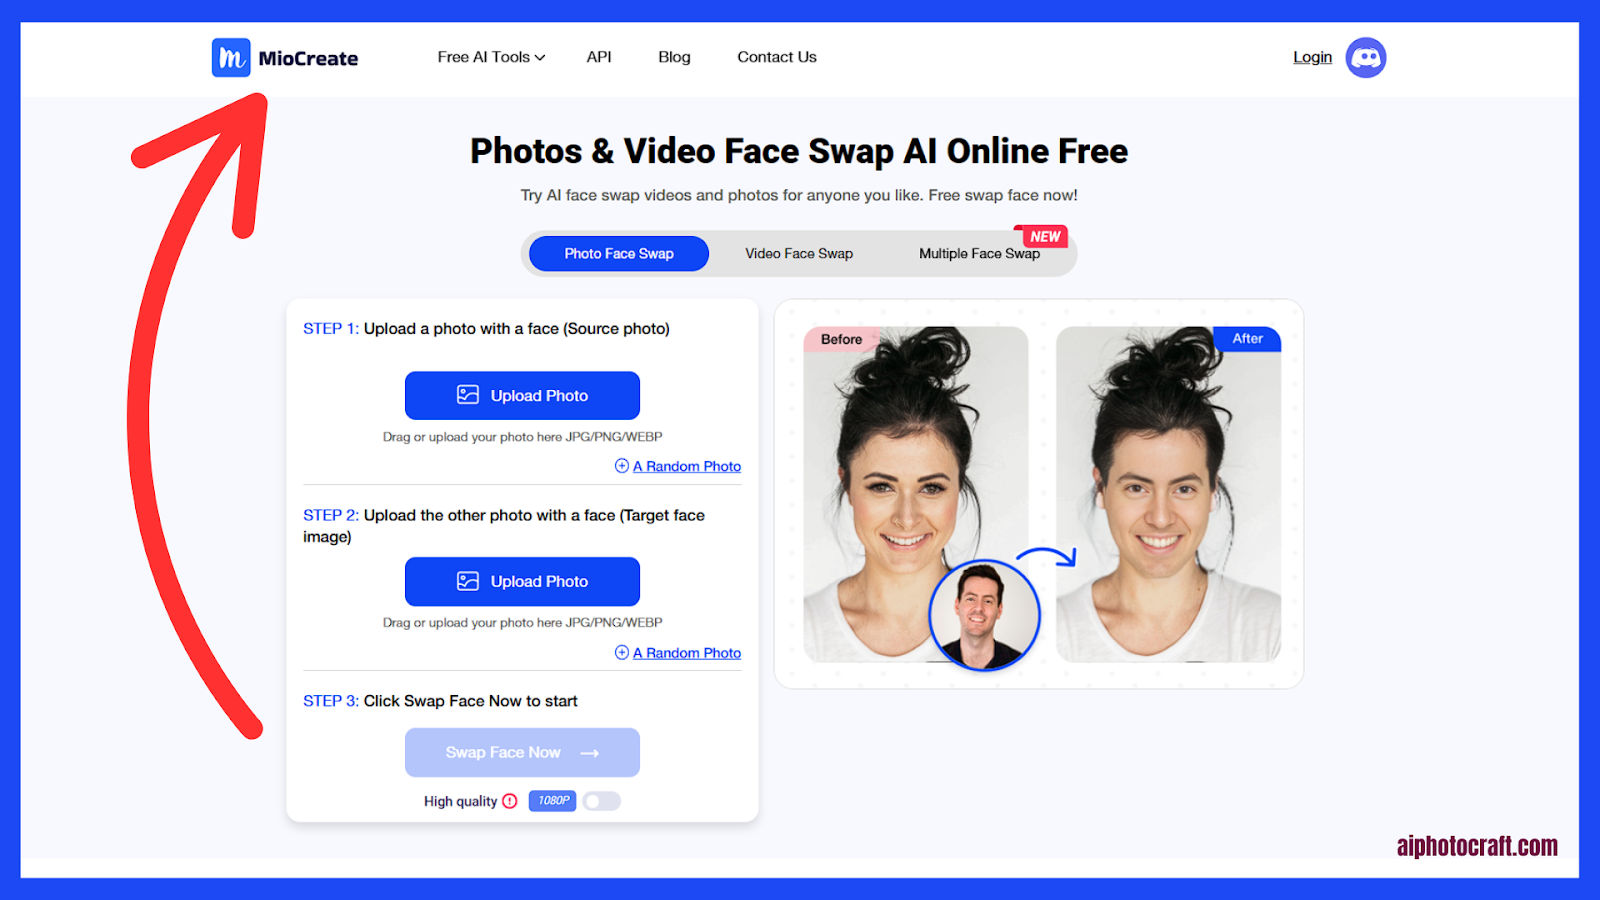
    AI is getting popular everywhere these days. From talking robots to smart tools that help you with your homework, artificial intelligence is making everything faster and easier. There are so many AI tools to have fun with. And if you’re looking for best alternative of MioCreate for Face Swapping to surprise your friends or make them laugh.  Just imagine swapping your sister’s face with a gorilla, or putting your teacher’s face on another teacher’s photo. You can even put a celebrity’s face on your own photo. Sounds fun, right?
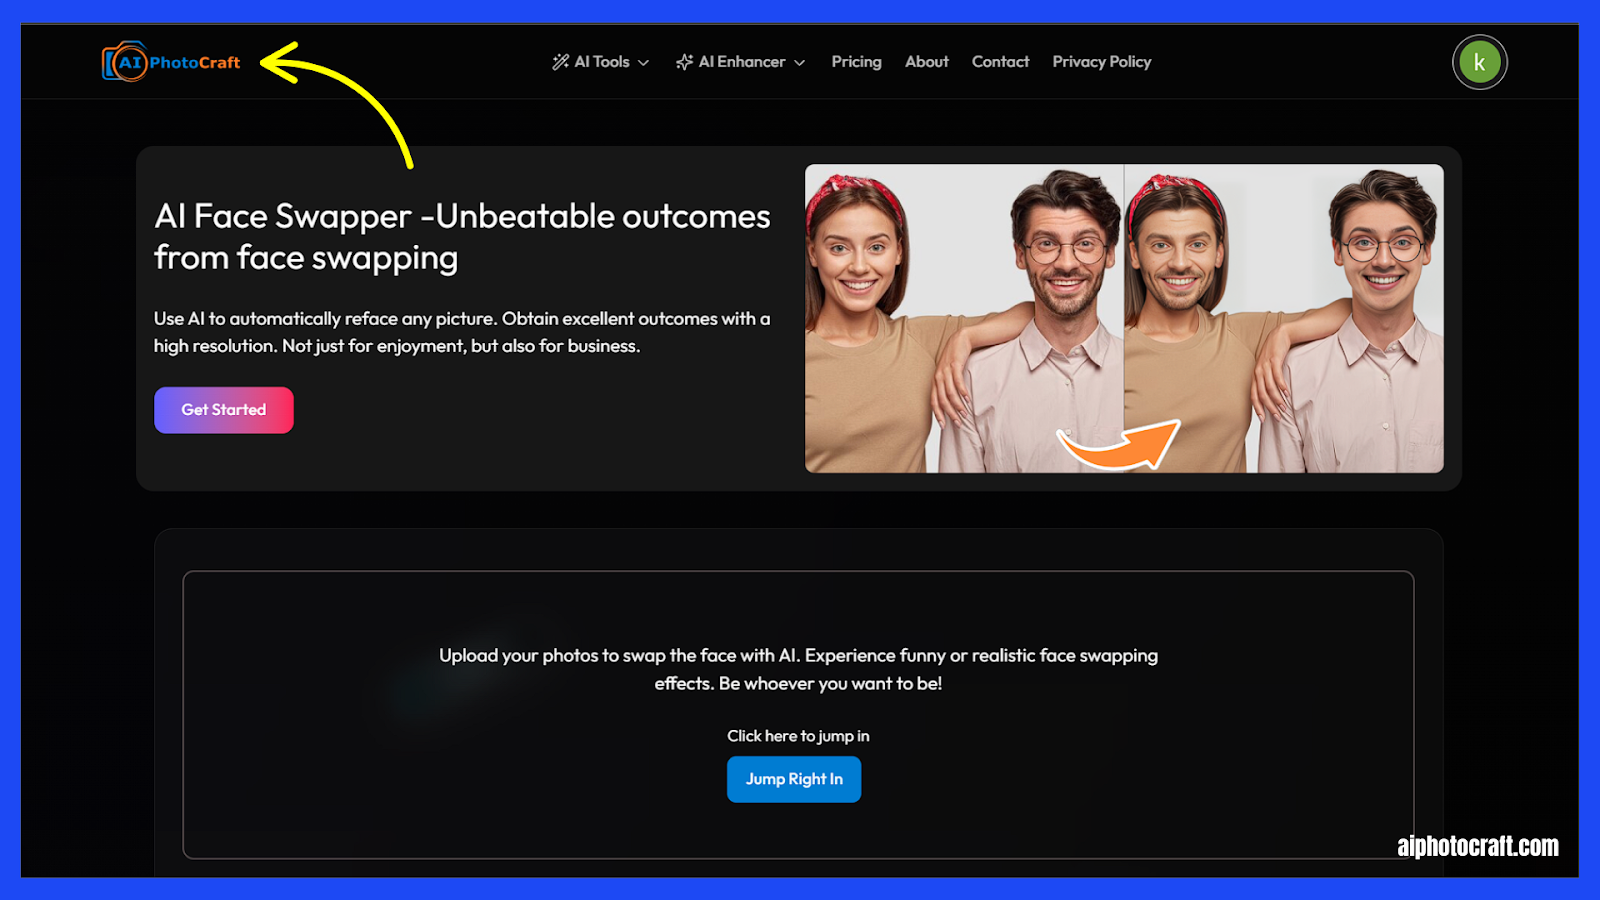
    If you’re already familiar with MioCreate and want to try something new that gives even better results when swapping faces, then yes, you are in the right place. In this article, I will show you best alternative of MioCreate for Face Swapping with a full comparison with examples .
    But before we dive in, let’s understand the technology a little bit.

    What is Face Swapping?

    Face swapping is a process where you take a face from one photo and put it on another photo. It is like putting your face on another body. You need a special tool to make it look realistic, and both MioCreate and AIPhotoCraft use powerful AI tools to do this. 

    They make face swapping fun and easy. These two cool tools, MioCreate and AIPhotoCraft, help you to do this face-swapping magic. Although both do the same work, we also need the best results, a faster approach, good privacy and security, and user-friendly pricing. In this case, AIPhotoCraft stands out.

    About MioCreate:

    Best alternative of MioCreate for Face Swapping
    MioCreate is a tool that started back in 2005. It’s been around for a long time and has won over 50 awards! Millions of people use it because it’s easy to use and makes face swapping super fun. You can swap faces in photos or videos,  like putting your face on a movie star or a funny cartoon character.

    Best alternative of MioCreate for Face Swapping: AIPhotoCraft:

    AIPhotoCraft is a newer face swapping tool that can make your photographs exciting and fun. It uses smart AI to help you create cool and funny pictures in just a few steps. You can swap one face and even two faces at the same time. It is perfect for making funny photos, funny memes and funny cartoons by swapping faces. In AIPhotocraft, you get 10 free credits daily when you sign up. It is very simple and great for those people, who are not even familiar with the technology. You have to just click to do your work and AI handles all your tasks.

    Face swapping process in AIPhotocraft:

    1. Open AIPhotoCraft in your browser using your computer or mobile phone. 
    2. Sign up using your Google account or enter your name, email, and password to sign up.
    3. Click the “Jump Right In” button to get started and you will be directed to a place where you do face swapping.
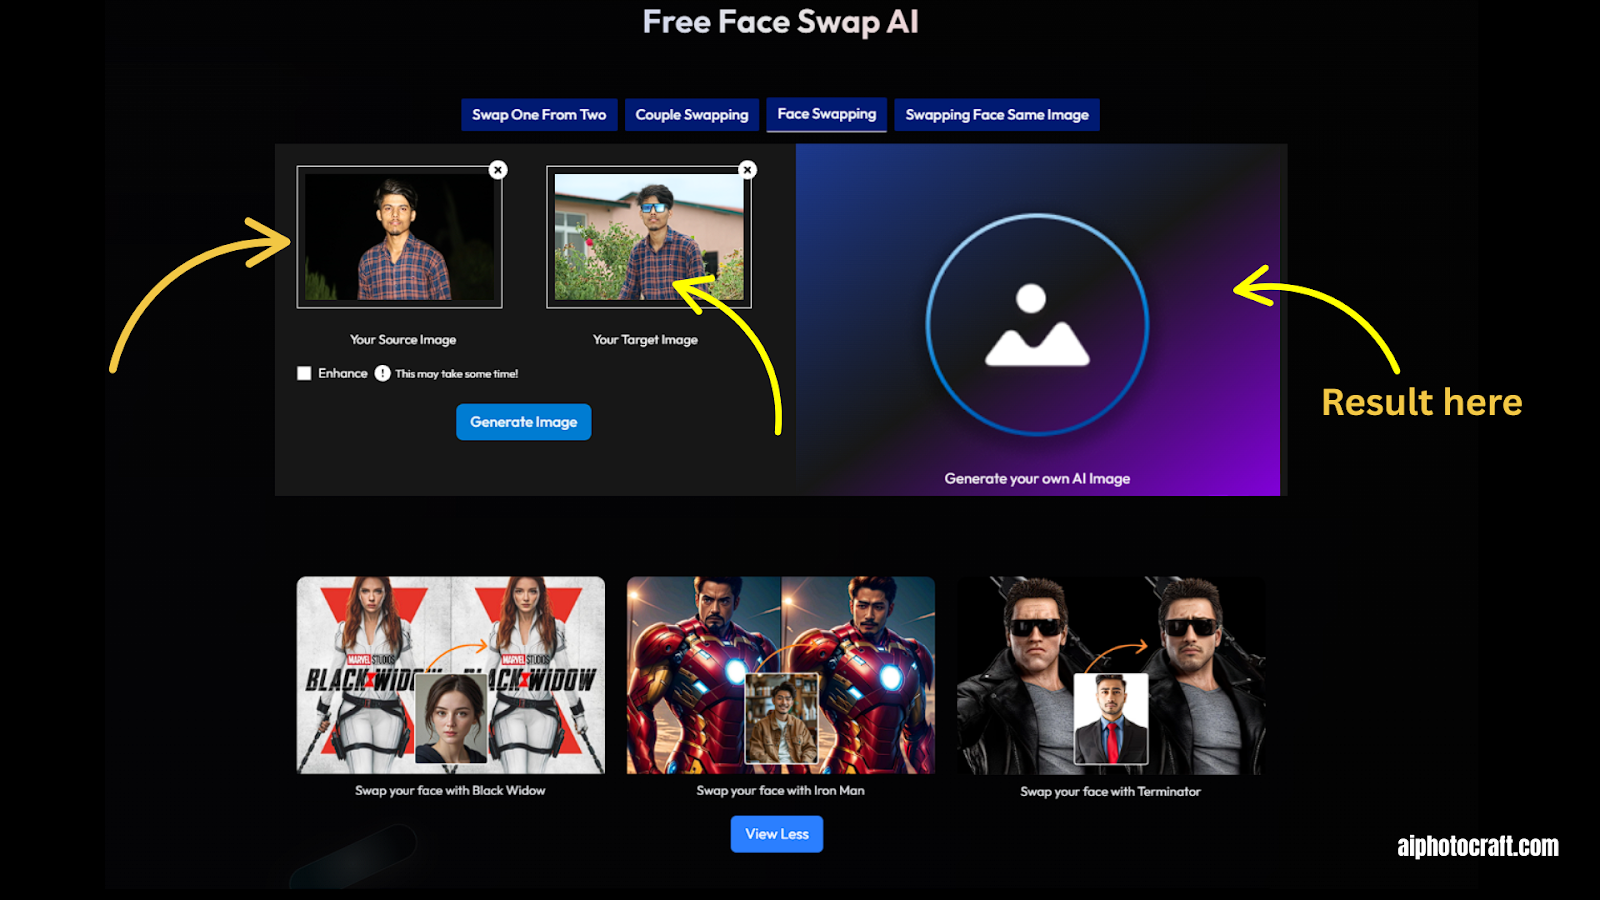
    4. Click on “Upload Target Image” to upload the image you want to use as the main image.
    5. Then, click on “Upload Source Image” to upload the face you want to swap.
    6. Once both images are uploaded, click “Generate Image” to create your face swapped image. AI will do its magic, and you will get a brand new face swapped image. Then, you can download the image and have fun.

    Face swapping process in MioCreate:

    1. Go to the MioCreate website by using your browser on your laptop or mobile phone.
    2. Click on the “Free Face Swap” button to proceed.
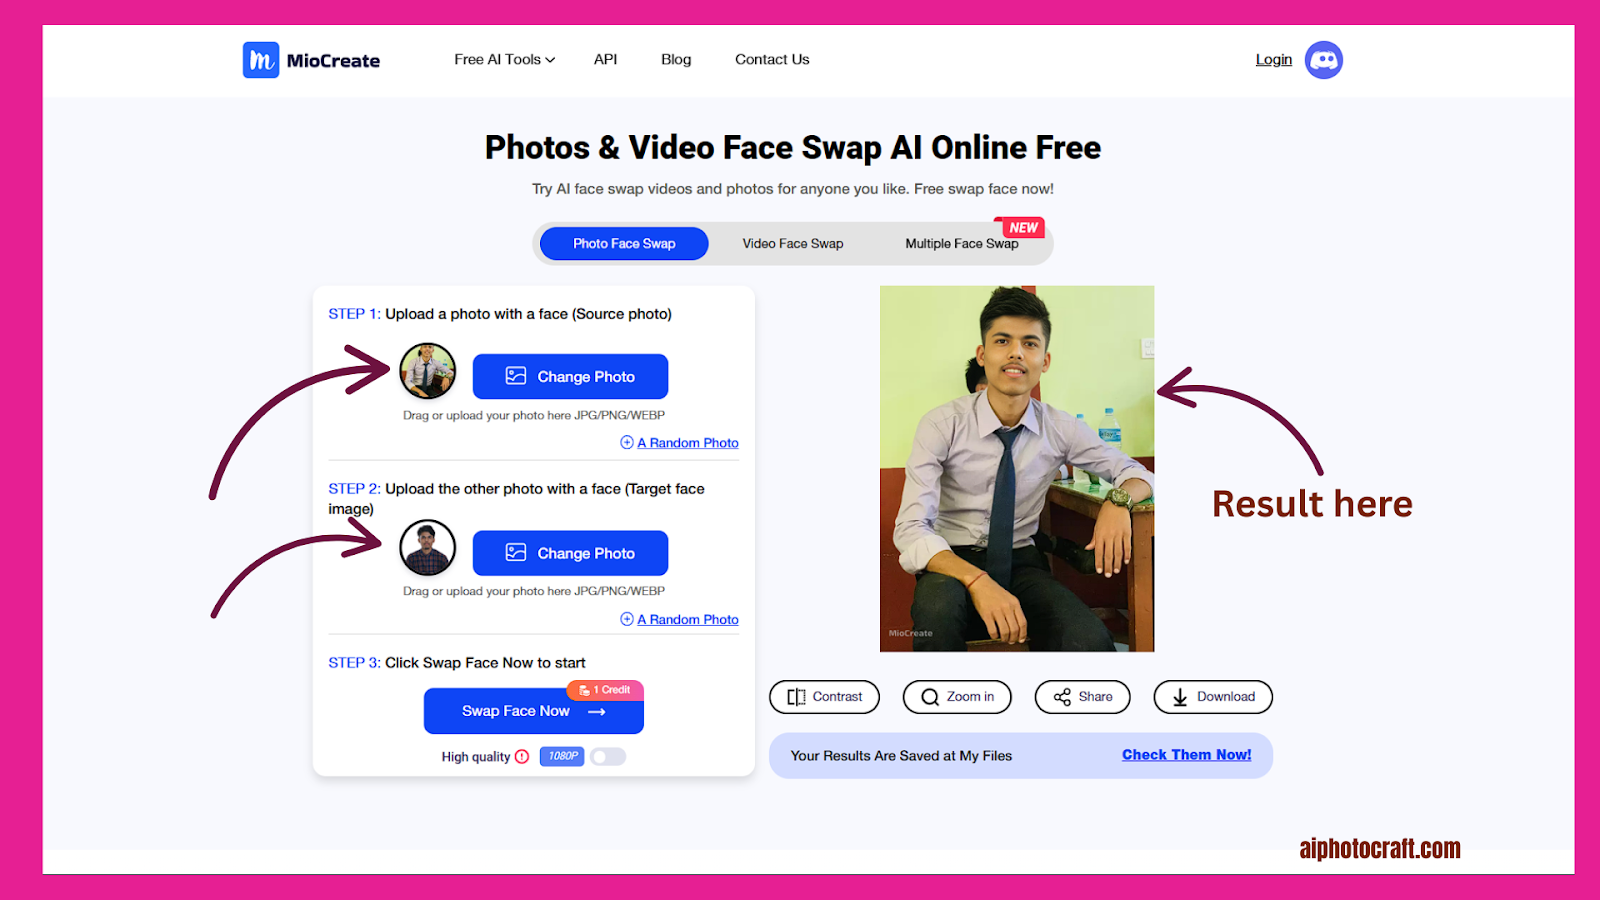
    3. In Step 1, click on upload your source photo to upload the face you want to swap.
    4. In Step 2, upload your target photo to upload the image you want to use as the main image.
    5. Click the “Swap Face Now” button.
    6. The AI will do its work and create your swapped image.
    7. Click the “Download” button to save the image.
    8. You’ll be asked to sign up. Just enter your email to complete the signup.
    9. Now, you can download your face swapped image and enjoy.

    Pricing of Miocreate:

    MioCreate offers three subscription plans with premium benefits:

    The Monthly plan at $4.99 provides 80 credits for 80 photos or 3 minutes of video face swaps. 

    The Half yearly plan at $12.99 gives 350 credits for 350 photos or 12 minutes of video.

     The yearly plan at $19.99 offers 1,000 credits for 1,000 photos or 33 minutes of video.

     All plans includes:

    1. 120-minute max video duration
    2. multi-face swaps for photos and videos
    3. no watermark
    4. HD quality (max 500M)
    5. PRO model access
    6. Early feature access
    7. Priority processing
    8. email support
    9. Credits renewed according to the plan.

    Pricing of AIPhotoCraft:

    MioCreate offers three subscription plans with premium benefits:

    The Free plan at $0 per month offers 10 credits with access to 3 basic styles including video to cartoon, API Access, multi-image generation in text to image and images are saved up to 1 month.

    The Basic plan at $10 per month provides 1,000 credits, high-quality images, all styles, premium support, video to cartoon, API access, multi-image generation, and images saved for up to 1 month.

    The Pro plan, the most popular at $50 per month, includes 2,500 credits, high-quality images, all styles, premium support, video to cartoon, API access, multi-image generation, and indefinite image storage.

    The Enterprise plan requires contacting for pricing, offers unlimited credits, high-quality images, all styles, premium support, video to cartoon, API access, multi-image generation, and indefinite image storage.

    Comparing Miocreate and AIPhotoCraft: Which one is Better for face swapping?

    1. MioCreate gives you 1 free credit every day. You can start using it without signing up but to download the image, you have to sign up. It also has video face swaps feature and works on phones, tablets, and computers. You can choose a 1-month, 6-month, or 1-year plan with cool features like HD quality and no watermark.
    2. AIPhotoCraft gives you more free stuff like 10 credits every day. It also has easy pricing: $20 for one month, $45 for three months, $65 for six months and $200 for 1 year. All plans come with exciting tools like cartoon video, high-quality pictures, and extra styles. It is also super simple to use and it has a user-friendly interface.
    3. When it comes to privacy, AIPhotoCraft is better. It deletes your photos right after you’re done, so your pictures are safe. MioCreate saves your photos while swapping but deleting them right away is far better when we talk about privacy. So, AIPhotoCraft wins in keeping your data private.
    4. AIPhotoCraft also has a couple face swap feature but this feature is not available in mioCreate. 
    5. You can do your task with just 3 easy steps (Upload, Swap and Save).
    6.  AIPhotoCraft makes face swapping quick and easy. If you want a better deal, fun features, and better privacy, AIPhotoCraft is the best alternative to MioCreate.

    Conclusion:

    Face swapping is like a magic trick for your photos. Both Miocreate and AIPhotoCraft are good but there is something better we talked about earlier in AIphotocraft which makes it more feasible than mioCreate. MioCreate is great for videos while AIPhotocraft is perfect for creative photo ideas and extra privacy. Try AIPhotoCraft: Best alternative of MioCreate for Face Swapping for a safe, fun experience with two-face swaps feature and enjoy. Give it a try to AIphotocraft and share your cool photographs with friends and family and have fun. If you like AIPhotocraft, don’t forget to tell us in the comment below. Happy face swapping.

  • How to Easily Remove Unwanted Objects from Photos for Free in 2025:

    How to Easily Remove Unwanted Objects from Photos for Free in 2025:

    Remove Unwanted Objects from Photos

    We usually saw something annoying in the background of our photographs. It might be a random person walking, a trash, or something that ruins the vibe of photographs. You don’t need to be a photo editing expert or buying expensive software to fix it. There are free online tools that make it super easy to Remove Unwanted Objects from Photos. 

    In this Article, I will show you how to use awesome tools like Photoroom, Cleanup.pictures, Pixelcut, and Magic Studio to clean up your pictures in just a few clicks. So, without further delay, let’s dive deep into how to remove objects like people, text, or annoying things from photographs for free.

    Remove Unwanted Objects from Photos trending nowadays. But Why?

    Before we dive into the tools, let’s talk about why removing objects from your photos is trending in the internet.  Imagine you’re at the beach or some popular places to visit like tajmahal,  and you take a beautiful picture. But when you look at the photo, there’s a random object in the corner of photo that ruins the overall photo. Like this, may be you are selling something online, and there’s a messy background in your product photo. Removing these distractions makes your photos look cleaner, more professional. So, due to this reason, peoples are widely using these tools and these tools are trending on internet.

    Some common reasons people remove objects from photos:

    1. To make personal photographs look nice for sharing on social media.
    2. To create professional-looking product photos for online stores.
    3. To remove people or annoying things that usually enhance your picture.
    4. To get rid of watermark, text, or logos from photographs. These includes photos downloaded from paid websites and social media.

    Now, here are some of the most popular tools available online that you can use to enhance your photographs.

    1. Photoroom: Quick and Easy Object Removal:

    Remove Unwanted Objects from Photos

    Photoroom is a user-friendly tool that uses artificial intelligence (AI) to remove unwanted objects from photos in seconds. It is a perfect tool for beginners because it’s so simple to use.

    How to Use Photoroom to remove the unwanted objects from your photographs?

    1. Go to photoroom: Open your web browser and visit Photoroom’s object removal tool.
    2. Upload your photo: Click the button(Select a picture) or drag  to upload your photo. You can use JPG or PNG files. 
    3. Select the object: Use the brush tool to paint over the object you want to remove. You can make the brush bigger or smaller according to your need.
    4. Let’s see the magic: Once you’ve highlighted the object, Photoroom’s AI will erase it and fills the background to make it looks natural. This usually takes just a couple of seconds.
    5. Download your photo: If you’re happy with the result, click download and select the standard resolution of 1280 * 1280 px and save your edited photo in your phone or computer.

    Quality Features of Photoroom:

    1. It is  fast and free for basic edits.
    2. The AI is really good at erasing the unnecessary objects and maks the background look like the object was never there.
    3. You can also change background or resize your photo if you want.

    2. Cleanup.pictures: Perfect for detail edits:

    Cleanup.pictures is another free tool  great to remove unwanted objects from photos, people, or even text from photos. It’s a bit more precise. So, it’s perfect if you need to clean up small details.

    How to Use Cleanup.pictures to remove unwanted objects from your photographs?

    1. Go to cleanup.pictures: Open your web browser and visit Cleanup.pictures.
    2. Upload your image: Click or drag an image file to upload your photo. It supports most image formats like JPG and PNG.
    3. Brush over the object: Click on continue with standard Definition(SD). Use the brush tool to cover the object you want to remove and select the eraser to erase the unwanted objects from your photograph. You can adjust the brush size to be super precise according to the object you want to erase.
    4. Wait for the magic: AI will remove the object and fill in the background. If it doesn’t look perfect, you can try brushing over the area again and again to get precise output.
    5. Save your photo: Once you’re happy, download your edited photo for free.

    Some features of Cleanup.pictures:

    1. It’s completely free and no sign-up needed.
    2. It’s great for removing small things like text, logos, or cracks from old photos.
    3. Using a slightly bigger brush than the object helps the AI to understand the object better.

    3. Pixelcut: Great for product photos:

    Remove Unwanted Objects from Photos

    Pixelcut is a free online tool that’s especially popular to remove unwanted objects from photos. It works for any kind of picture. Its cleanup picture tool is super easy to use and makes your photos look professional.

    How to Use Pixelcut to remove the unnecessary objects from your photographs?

    1. Visit pixelcut: Open pixelcut in your web browser.
    2. Upload your photo: Click Upload Image and choose your photo. Pixelcut supports JPG, PNG and even other various files.
    3. Select the object: Use the brush to select over the object you want to erase. You can change the brush size to small or large according to the need.
    4. Erase and Check the result: Click “Erase,” and Pixelcut’s AI will remove the object and fills the background. If it’s not perfect, you can try again. You can click generate button to magically generate image parts.
    5. Download the Result: Save your edited photo by clicking download 720*1080 px preview resolution for free.

    Features of Pixelcut:

    1. It’s free and doesn’t require a lot of steps.
    2. It’s awesome for e-commerce sellers who want clean product photos.
    3. You can also remove backgrounds or generate new images if you want.
    4. It is not so accurate than the previous two tools but works fine for simple details. If you’re working with a complex background, it might take a couple of tries to get better results.

    4. Magic Studio: simple and easy:

    Remove Unwanted Objects from Photos

    Magic Studio’s Magic Eraser is a fun and easy tool that helps you remove unwanted objects from photos with just a few clicks. It is perfect for quick edits and also freely available.

    How to Use Magic Studio to remove annoying objects from photographs?

    1. Go to Magic Studio: Visit Magic Studio’s Magic Eraser in your browser.
    2. Upload Your Image: Drag and drop your photo or click to upload it. It works with JPG, PNG, and other common formats.
    3. Select the Object: Use the brush to highlight the object you want to remove. You can zoom in or adjust the brush size for better control and stability.
    4. See the magic: Click “Erase,” and the AI will remove the object. If the result is not perfect according to need, try erasing again or adjust your selection.
    5. Save Your Photo: Download your edited photo when you’re done.

    Why Magic Studio is great?

    1. It’s free and doesn’t need a sign-up.
    2. It’s super simple, so you can edit photos quickly.
    3. It works well for removing people, text, or small objects.

    5. Picwish.com: Easy Way to Remove Watermarks and Unwanted Objects from Photos

    Remove Unwanted Objects from Photos

    PicWish is a simple and powerful online tool that helps you to remove unwanted objects from photos. It helps to remove things like text, logos, or any unwanted objects from your photos in just a few clicks. It offers both automatic and manual removal features to fit your editing needs. 

    How to Use PicWish to Remove Watermarks or Objects from Photos?

    1. Go to Picwish: Open the PicWish object remover tool in your browser.
    2. Sign up for free: Create a free account. You can remove up to 5 images without paying.
    3. Upload your image: Click to upload your photo or drag and drop it. PicWish supports JPG, PNG, and other various formats.
    4. Try auto mode (Best for text watermarks):
      If your photo has a text or logo watermark, then use the auto mode. AI detect and erase the watermark automatically.
    5. Use manual tools (For precise editing):
      Use the brush, rectangle, or lasso tools to remove objects like people and unnecessary things like clutter. Then, press remove and let the AI do your work.
    6. Download your edited image: Download your photo for free when you’re done.

    Features of Picwish:

    1. Free to use for up to 5 photos.
    2. Simple and beginner-friendly interface.
    3. Works well for removing watermarks, people, text, or small objects.
    4. Offers both automatic and manual removal options.

    Tips for Getting the Best Results:

    No matter which tool you use, here are some easy tips to make your photos looking great:

    1. Choose the Right Photo: Tools work best with clear photos. If your image is blurry, the AI might struggle to fill in the background.
    2. Cover Shadows: If the object you’re removing has a shadow, brush over the shadow too. This helps the AI create a seamless background.
    3. Try Multiple Times: If the result isn’t perfect, don’t give up! Brush over the area again or adjust the brush size.
    4. Use Simple Backgrounds: Photos with plain backgrounds (like a wall or sky) are easier for AI to edit than busy ones (like a crowded street).
    5. Use small sections:  If you’re removing long, thin objects like power lines, erase them in small sections for the best results.
    6. Check the Lighting: Make sure the lighting around the object matches the rest of the photo. Some tools might leave a slightly different color if the lighting is uneven.

    Why use free tools instead of photoshop?

    1. They are free: Photoshop costs money, but these tools are free perfect for us.
    2. They are easy: You don’t need to learn complicated software. These tools are as simple as painting with a brush. No signin required which saves our time.
    3. They are fast: You can edit a photo in seconds with just one click.
    4. They use  AI: The AI does the hard work of figuring out what the background should look like, so you don’t have to.

    Conclusion:

    To Remove unwanted objects from photos is not as hard as you think. With free tools like Photoroom, Cleanup.pictures, Pixelcut, and Magic Studio, you can clean up your pictures in just a few clicks. Whether you’re fixing a family photo, making a product image for your online store, or just having fun with your selfies, these tools make it super easy to make your photographs great. Try one of these tools, and see how easy it is to make your pictures look amazing. If you have tried these tools before or going to try these tools, Don’t forget to share it with us in the comments below. Happy editing!